
First Mods
One of the cool things about owning a PT Cruiser is making it your own by customizing it. Fortunately there are several sources of custom performance and appearance aftermarket parts for the PT Cruiser.
But before you start adding the bling, I would recommend a few 'starter' mods. Some to improve safety, and some that should have been included at the factory.
Tools needed include your basic set of screw drivers and wrenches, and a hand held electric drill. A pry bar tool to remove the plastic rivets that hold on trim will be needed for the air cabin filter and horn mods. This tool looks like a two-pronged fork and can be found at most auto supply stores.
SilverStar Bulbs
The headlights are adequate, but for a brighter, whiter headlight change the stock bulbs with Sylvania SilverStar bulbs.
Here are the SilverStar part numbers for the PT Cruiser:
9006XSST - low beam headlight
9005XSST - High beam headlight
9006 ST - Angled connector for fog lights.
Replacement is fairly simple if you've got a skinny hand. The bulbs are accessible through a plastic door in the wheel well, just ahead of the tires.
Anytime you replace these types of headlight bulbs it's a good idea to wear plastic gloves. They will protect the bulb from touching your skin, and oil from your skin will reduce the life of the bulbs. These gloves are available in bulk at most auto supply stores.
This mod is the most costly of the first mods I recommend. Each pair of bulbs currently runs about $30-$40, so if you have fog lights the total can run over $100.00.
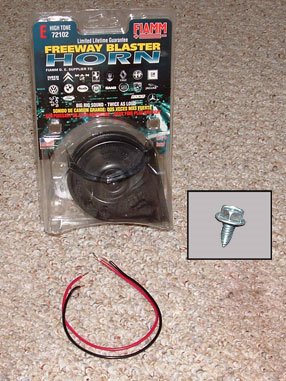
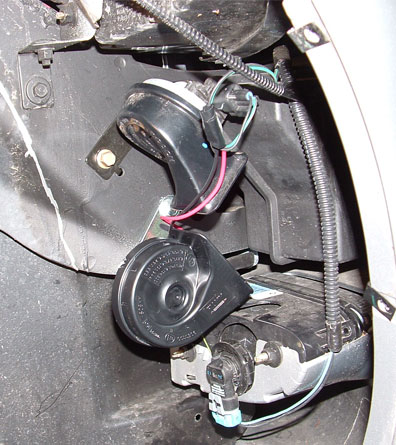
Add a High Tone Horn
From 2003 on, PT Cruisers have been sold with only the low tone horn, instead of the standard low tone/high tone combination. This brilliant marketing plan has probably saved Chrysler a few thousand dollars, but at the expense of safety.
This mod should never have been necessary, but is one every 2003 and newer PT Cruiser owner should do. See my July 16th post for complete instructions.
This mod is "do-able" by just about anyone handy with tools and only costs the price of the high tone horn and a bit of wire: about $20.00 total.
Cabin Air Filter
This mod only affects domestic US Cruisers. PT Cruisers in the export market already have the cabin air filter in place.
The US version of the PT Cruiser vents outside air directly into the inside of the car without any filtration. Admittedly, this mod is not in the "must have" category. Unless you're an allergy sufferer cruising around just about any kind of plant life. I've read a few first hand account of how well the cabin air filter works at removing pollen from the air.
Fortunately, this is a fairly simple mod to do and the filter currently costs only about $16.00.
Rear Mud Flaps
I can hear you from way over here:
"Mud flaps?!!! How old IS this guy?".
But take my word for it; if you want to keep your lower quarter panels paint chip-free a set of mud flaps is essential. Even if you don't plan on driving down any gravel or dirt roads you will almost certainly find yourself on a freshly re-tarred road with a nice thick layer of loose gravel, or a pot hole newly filled with a shovel full of hot road tar.
Mud flaps can even be fairly unobtrusive. You won't need a huge slab of rubber hanging from the back of your wheel well. Simply buy a plain black pair designed for passenger cars and mount them so the bottom edges are about 3"-4" below the bottom of the rear quarter panel.
Total cost: about $10.00.
So there you have it. One weekend's worth of work plus approximately $130.00 and you'll be ready to jump into those fuzzy dice and that chrome washer nozzles you've had your eye on.
But before you start adding the bling, I would recommend a few 'starter' mods. Some to improve safety, and some that should have been included at the factory.
Tools needed include your basic set of screw drivers and wrenches, and a hand held electric drill. A pry bar tool to remove the plastic rivets that hold on trim will be needed for the air cabin filter and horn mods. This tool looks like a two-pronged fork and can be found at most auto supply stores.
SilverStar Bulbs
The headlights are adequate, but for a brighter, whiter headlight change the stock bulbs with Sylvania SilverStar bulbs.
Here are the SilverStar part numbers for the PT Cruiser:
9006XSST - low beam headlight
9005XSST - High beam headlight
9006 ST - Angled connector for fog lights.
Replacement is fairly simple if you've got a skinny hand. The bulbs are accessible through a plastic door in the wheel well, just ahead of the tires.
Anytime you replace these types of headlight bulbs it's a good idea to wear plastic gloves. They will protect the bulb from touching your skin, and oil from your skin will reduce the life of the bulbs. These gloves are available in bulk at most auto supply stores.
This mod is the most costly of the first mods I recommend. Each pair of bulbs currently runs about $30-$40, so if you have fog lights the total can run over $100.00.
Add a High Tone Horn
From 2003 on, PT Cruisers have been sold with only the low tone horn, instead of the standard low tone/high tone combination. This brilliant marketing plan has probably saved Chrysler a few thousand dollars, but at the expense of safety.
This mod should never have been necessary, but is one every 2003 and newer PT Cruiser owner should do. See my July 16th post for complete instructions.
This mod is "do-able" by just about anyone handy with tools and only costs the price of the high tone horn and a bit of wire: about $20.00 total.
Cabin Air Filter
This mod only affects domestic US Cruisers. PT Cruisers in the export market already have the cabin air filter in place.
The US version of the PT Cruiser vents outside air directly into the inside of the car without any filtration. Admittedly, this mod is not in the "must have" category. Unless you're an allergy sufferer cruising around just about any kind of plant life. I've read a few first hand account of how well the cabin air filter works at removing pollen from the air.
Fortunately, this is a fairly simple mod to do and the filter currently costs only about $16.00.
Rear Mud Flaps
I can hear you from way over here:
"Mud flaps?!!! How old IS this guy?".
But take my word for it; if you want to keep your lower quarter panels paint chip-free a set of mud flaps is essential. Even if you don't plan on driving down any gravel or dirt roads you will almost certainly find yourself on a freshly re-tarred road with a nice thick layer of loose gravel, or a pot hole newly filled with a shovel full of hot road tar.
Mud flaps can even be fairly unobtrusive. You won't need a huge slab of rubber hanging from the back of your wheel well. Simply buy a plain black pair designed for passenger cars and mount them so the bottom edges are about 3"-4" below the bottom of the rear quarter panel.
Total cost: about $10.00.
So there you have it. One weekend's worth of work plus approximately $130.00 and you'll be ready to jump into those fuzzy dice and that chrome washer nozzles you've had your eye on.
posted by Robert | 9:53 PM
|
0 comments
![]()
![]()