

Can You Hear Me Now?
Incredible as it may sound, Chrysler decided to remove one of the two horns most cars come with on 2003 and newer PT Cruisers. Push the horn on these cars and you'll hear an anemic "neeeeee" sound that will barely get heard above the road noise of most SUV tires.
Here's how to add the high-tone horn to these cars:
Parts and Tools Needed
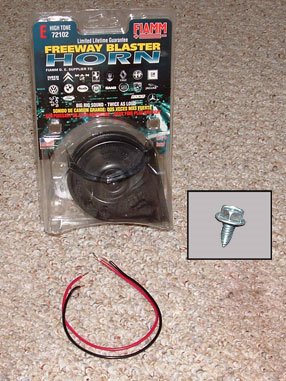
Photo 1 the parts you will need, which include an aftermarket hi tone horn (about $15 to $20), about 12 inches of stranded 10 or 12 gauge wire, and a sheet metal bolt. The mounting bracket and wire connections were included with the horn itself. You usually have a choice between a 125 db horn and a 132 db horn. Since you're going to all the trouble of adding an aftermarket horn, spend the extra $5 and get the louder horn. If there is a choice between a single wire and two wire horn, get the two wire horn.
The tools you'll need include a socket set, wire cutters, wire stripper, and a crimping tool or vise grip pliers. A drill and a 3/8" drill bit may be required to drill a new hole in the mounting bracket supplied with the horn. A pop rivet pry bar tool is also handy for removing the inner fender splash guard.
Step 1 - Remove the Right Front Wheel
The horn is located just behind the fog lights, and is accessed from inside the right front wheel well. Jack up the car and remove the wheel.
Step 2 - Remove the plastic inner fender splash guard
 Photo 2 shows the locations of the three sheet metal screws and plastic pop rivets holding the front half of the plastic splash guard in place. You'll only need to remove the front half of the splash guard. It's a light weight and flexible plastic that can be folded out of the way and held in place behind the disc brake calipers. The three plastic pop rivets can be removed with the pry bar tool, or by placing your fingers behind the splash guard next to the rivets and gently pulling.
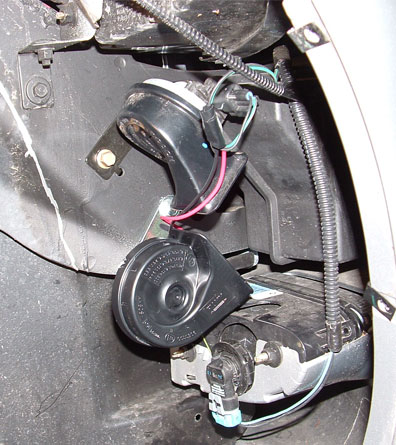
 Photo 2a shows the existing horn and fog light assembly. The two things to note are the pre-drilled holes for mounting the new horn, and the small space available to add one. The 2003 models are supposed to have the horn mounting bracket and wiring still in place, so your Cruiser may look slightly different than this.
Step 3 - Splice in the new wires
 Photo 3 shows the new wires (red and black) spliced onto the existing horn wires. I removed the existing horn to allow more room to work. After the wires are spliced and taped, attach them to the new horn.
Step 4 - Bolt on the New Horn
 This is where the lack of extra space rears its ugly head. My first attempt to bolt on the hi tone horn (photo 4a) looked like I had left plenty of clearance, but trying to replace the splash guard proved that looks can be deceiving. I removed the hi tone horn and drilled a new hole in the mounting bracket. Photo 4b shows the second attempt that allowed enough room for the splash guard.

Step 5 - Test it Out, Button it Up
Before putting it all back together again, make sure to test your new horn system. A quick push on the center of the steering wheel provides a very satisfying, I-won't-be-ignored-anymore HOOOONNNKKK!
All that's left to do is to fold back the plastic splash guard with the three sheet metal screws and three pop rivets, and remount the front tire.
There you have it. You've just completed the only mod that should never have been necessary, but the one that just might save your Cruiser from a trip to the body shop!
posted by Robert | 1:34 PM
![]()
![]()
0 Comments:
Post a Comment
<< Home